Partitioning your computer drive is helpful to better categorize your storage. You always have a system volume that stores the operating system files. Depending on your needs, you can create another new volume in Windows 11 and 10
Primarily, you partition your computer’s storage when you first clean install Windows 11 or 10 on your computer. However, your needs may change over time, and you may prefer to have a new volume for certain file types. Managing your computer’s storage is a way of categorizing your files, and it totally depends on the users. You have the flexibility to choose how many drives you should create and how much space each one should have, as long as the total capacity of your computer’s drive permits.
You create a new volume from an existing one on your computer. The important part is to decide which volume you should shrink and create a new volume from. It also depends on the size of your existing volume and the size of your new volume. So, consider the design and brainstorm before going for the implementation.
Moreover, you can extend a volume’s size on Windows 11 and 10. It is also essential as part of managing your computer’s storage. I will also discuss that in a separate section below in this guide.
Note: this guide is written based on Windows 11. However, the steps apply the same on Windows 10.
Create a New Volume in Windows 11 and 10: Steps
Creating a new volume is pretty easy once you have brainstormed and determined how much new space you need for a new drive. Before creating a new volume, you should decide on that. Additionally, you should be careful configuring your disk’s capacity to avoid file loss and its consequences. That said, follow the below steps to create a new volume in Windows 11 and 10.
- Press the Windows + R keys to open the Run utility.
- Type
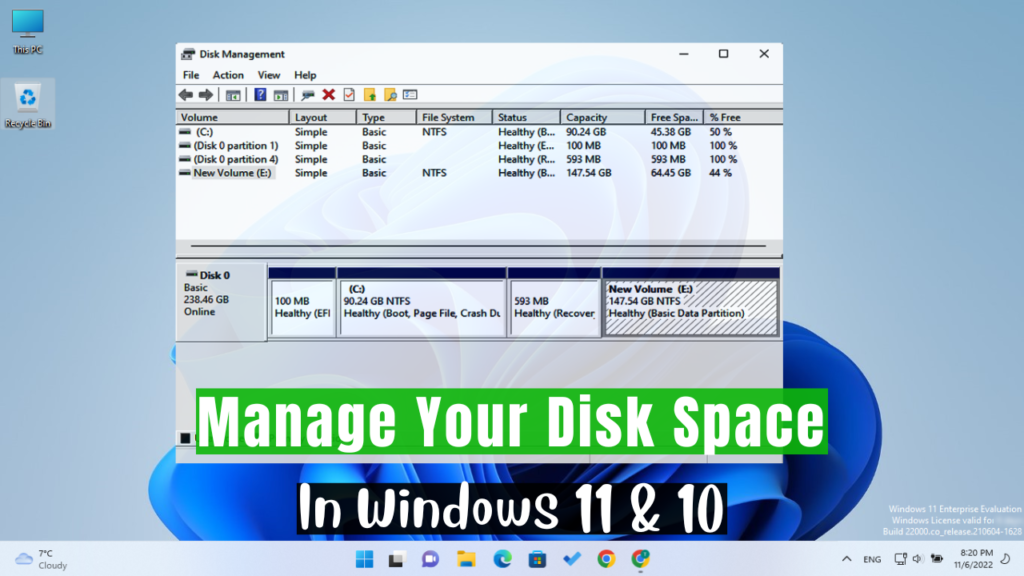
diskmgmt.mscand hit enter to open the Disk Management console. Tip: you can also reach this console by navigating through Control Panel >> System Tools >> Computer Management >> Storage >> Disk Management.

- On the Disk Management console, you can see the whole details of your disk; how many volumes you have, their types, file systems, and pretty much every detail. To create a new volume, right-click the volume from which you want to create a new one. Then, click Shrink Volume.

- Enter the amount of space to be shrunk from the volume in MB, as shown in the below picture. Then, click Shrink.

- Once your new volume is shrunk, it will be added to the right side of the volume. It is colored black and labeled unallocated. Right-click it and choose New Simple Volume.

- Click Next on the first window.
- Enter the size for your new volume in MB. If you want to use all the unallocated space, leave it as its default. Click Next once done.

- Choose a drive letter for your new volume and click Next.

- Select the file system and allocation unit size. Preferably, leave them as default. Then, your desired label for your new volume and click Next.

- Click Finish, finally.
That is it. Your new volume is created to this end. You can see it on the Disk Management console, which should also be added to your file explorer.
RELATED: Find Your MAC Address in Windows 11 and 10.
Extend a Volume in Windows 11 and 10
As mentioned earlier, you can extend the volume size in Windows 11 and 10. It is a straightforward process now that you know how to create a volume in the previous section.
To extend a volume, you should have unallocated space on the right side (in the disk management console) of the volume you want to extend. You can not extend a volume without an unallocated space or with unallocated space not on the right side of the target volume.
Let’s say you have volume D on the right side of volume E, and you want to extend the E using space from the D volume. For that, you need to delete the D to make it unallocated and then extend the size of E from the D. You must move your files from the D first.
The below steps are with consideration of the above scenario; delete the D volume and extend E from D.
- Open the Disk Management console (steps 1 and 2 of the previous section)
- Right-click the target volume (D in our example) and click Delete Volume. (Files in D will be deleted.)

- Click Yes on the warning window.
- Right-click the volume you want to extend (E in our example) and select Extend Volume.

- Click Next on the first window.
- Enter the amount of space you want to add to your E volume from the total available unallocated space, as shown in the below picture. Click Next once done.

- Click Finish, finally.
That is how you can extend a volume size in Windows 11 and 10.
You may also like to read Enable TPM and Secure Boot for a Virtual Machine in Hyper-V.
Why Extend Volume Option is Disable?
The Extend Volume option for a volume is disabled if there is not an unallocated space on the right side of that volume or if there is another active partition in between the unallocated space and the volume.
Let’s say you want to extend your C drive. You need an unallocated space right on the right side of the C volume. Now, if you have a volume, let’s say E, on the sharp right side of your C volume for storing your file, you can somehow manage to create an unallocated space on the sharp right side of your C volume by backing up your E drive’s file and deleting the volume. I discussed it in the previous sections while extending a volume.
The problem that you can not resolve is when you have a system volume in between your extending drive and unallocated space. Well, you can not solve this with the Windows built-in Disk Management tools. Instead, you should use third-party softwares such as MiniTool and EaseUS Partition Master.
RELATED: Switch Between Local and Microsoft Accounts in Windows 11.
Wrap Up
Managing your disk space in Windows is a mostly-used skill for you as a common user and especially as an IT professional. We all have precious data and want to categorize and manage our storage space as per our personal or enterprise needs.
In Windows 11 and 10, typically, you can create a new volume, delete a volume, and extend a volume easily with built-in Disk Management tools, as I discussed in the above section. Sometimes, however, it is impossible to extend a volume, as I discussed earlier—no worries, with bundles of third-party tools mostly with such capabilities for free.
I hope this guide could be helpful to you. Feel free to put your questions and thoughts in the comment section. Lastly, to support our guide writing, please share our guides with your colleagues who can find them helpful. Thanks!
Also, read Create a New Local User Account in Windows 11: Four Methods.