Like previous versions of Windows OSes, you can create multiple user accounts in Windows 11. This capability allows you to share your computer with your family members and friends, with separate user accounts for each one. Each user account has its own private space for storing its personal files and data that no other users can access unless they provide the correct authentication. Additionally, there are also different settings and files associated with each user account that gets created when you add a new user account on your Windows 11 computer. All these files and settings together consume your computer’s storage space. So, when it comes that you no longer share your computer with a particular user, you should delete the user account and its profile from your Windows 11 to free up your disk space.
When you delete a user profile, all the data associated with that user gets removed. It is different from deleting a user account. A user account deletion removes the user and not its associated data. However, you can choose to delete a user’s profile while deleting the user with some methods, as you will see in the below sections.
There are various ways to delete a user profile in Windows 11 that I will cover in this guide. You can delete a user profile when you delete the user itself. Also, you can delete a user profile that you have already deleted itself but kept its files. In this guide, I will discuss the solutions considering both of these scenarios. I will start from the easiest and most comprehensive method to the advanced one. So, stick to reading the guide.
RELATED: Four Methods to Create a New Local User Account in Windows 11.
Delete User Profile in Windows 11 Using Windows Settings
The first method to delete a user profile I cover in this guide is by using the Windows Settings window, as it is the modern way of doing things in Windows OSes. With this method, you delete the user profile while deleting the user itself. So, if you have already deleted the user and want to remove its files, this method is not the solution. See other methods below.
- Press the Windows + I shortcut keys to open Windows Settings. Or, go to the Start Menu and click Settings.
- Choose Accounts on the left menu and open Family and other users on the right pane. You should click the Other Users option on some editions and versions of Windows 11.

- Under Other Settings, click the down arrow icon associated with the user you want to delete and click the Remove button.

- On the new window, click Delete Account and Data.

- Wait for a few seconds. Once completed, check your C:\Users directory in the file explorer. No folder for the deleted user should exist there.
As easy and quick as that, you can delete a user profile in Windows 11 through the Windows Settings window.
RELATED: Manage User Accounts with Command Prompt in Windows 11 and 10.
Remove User Profile in Windows 11 Using Control Panel
The second comprehensive and easy method to delete a user profile in Windows 11 is via the Control Panel. Similar to the previous section, this method is for the users that still exist, and you delete the user profile along with deleting the user itself. See the steps below for this method.
- Go to the Start Menu and search for Control Panel. Then, open the best match.
- Click User Accounts on the Control Panel console.

- If Control Panel View by is set to Category, you need to click the User Accounts again on the next window.
- Click Manage another account linked text, as shown in the below shot.

- Open the user account you want to delete it and its profile.
- Click Delete the account blued text.

- Next, click the Delete Files button to remove the user profile along with the user account itself.

- Finally, click the Delete Account button.

That is all you need to go through with this method of deleting a user and its profile in Windows 11.
Also, read Switch Between Local and Microsoft Accounts in Windows 11.
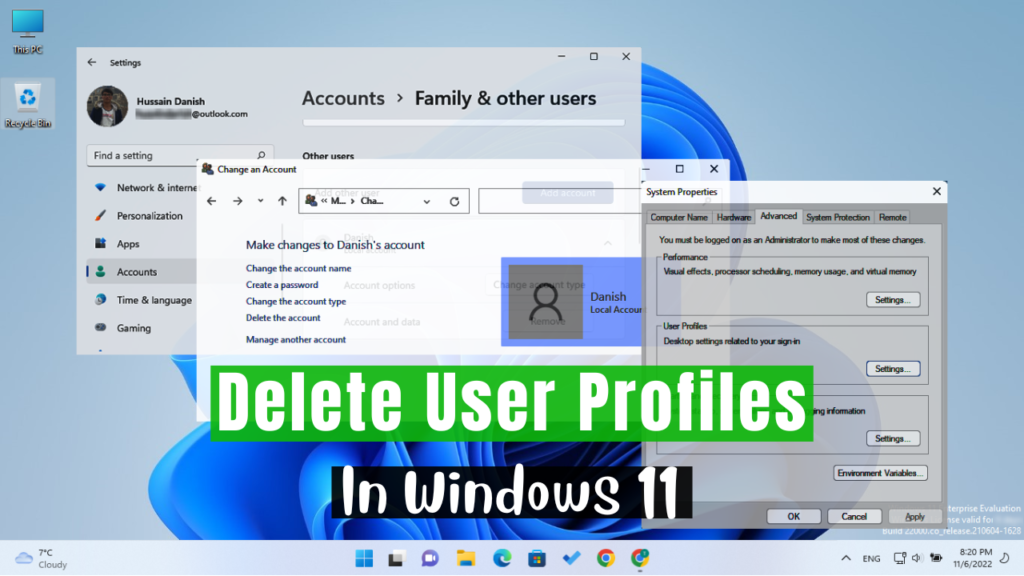
Delete User Profile in Windows 11 Via System Properties
The two previous methods were to delete a user profile along with deleting the user. If you have already deleted a user account, but its profile and data still exist, use this method to delete its profile and data. The System Properties window has a User Profiles section where you have the option to remove them. The steps are as the followings.
- Press Windows + R keys to open the Run utility.
- Type
sysdm.cplin the Run dialogue box and hit enter to open the System Properties window. Tip: You can also reach this window by navigating through Settings >> System >> About>> Advanced System Settings. Or by simply searching for the Advanced System Settings in the Start Menu and opening the best match.

- On the Advance System Settings, select the Advance tab and click Settings in the User Profiles section.

- Here are the user profiles both for your deleted account and existing accounts. For the deleted account, the user profile name is Account Unknown, as you can see in the below shot. To delete a user profile, select it and click Delete.

- Lastly, click Yes on the warning window.
That is it! The perfect method to delete user profiles of the account which are already deleted.
You may also like to read Factory Reset Your Windows 11 Computer.
Wrap Up
Every user account you create on your Windows 11 computer consumes your computer’s storage space to store its private files and data. You should delete the user profile while you remove a user or right after removing it to free up your disk space from unnecessary files and to clean up the messy things in your computer.
So far, I have discussed three methods using which you can delete user profiles in Windows 11. The two first methods discussed cleaning user profiles while deleting the user account. The last method discussed the steps to remove a user profile for an account that doesn’t exist on your computer, but its profile does.
I hope you find this guide helpful. If there is any question or thought, feel free to put them in the comment section. Also, please share this guide with your friends who you think can find it helpful. Thank you.